Account Settings

⚙️ Overview
Configure key system settings for your Availo account. Learn how to manage account information, control system features, and customize your organization's settings.
---
⚙️ Account Settings
The Account Settings module allows administrators to configure key system features, user permissions, notifications, and account details.
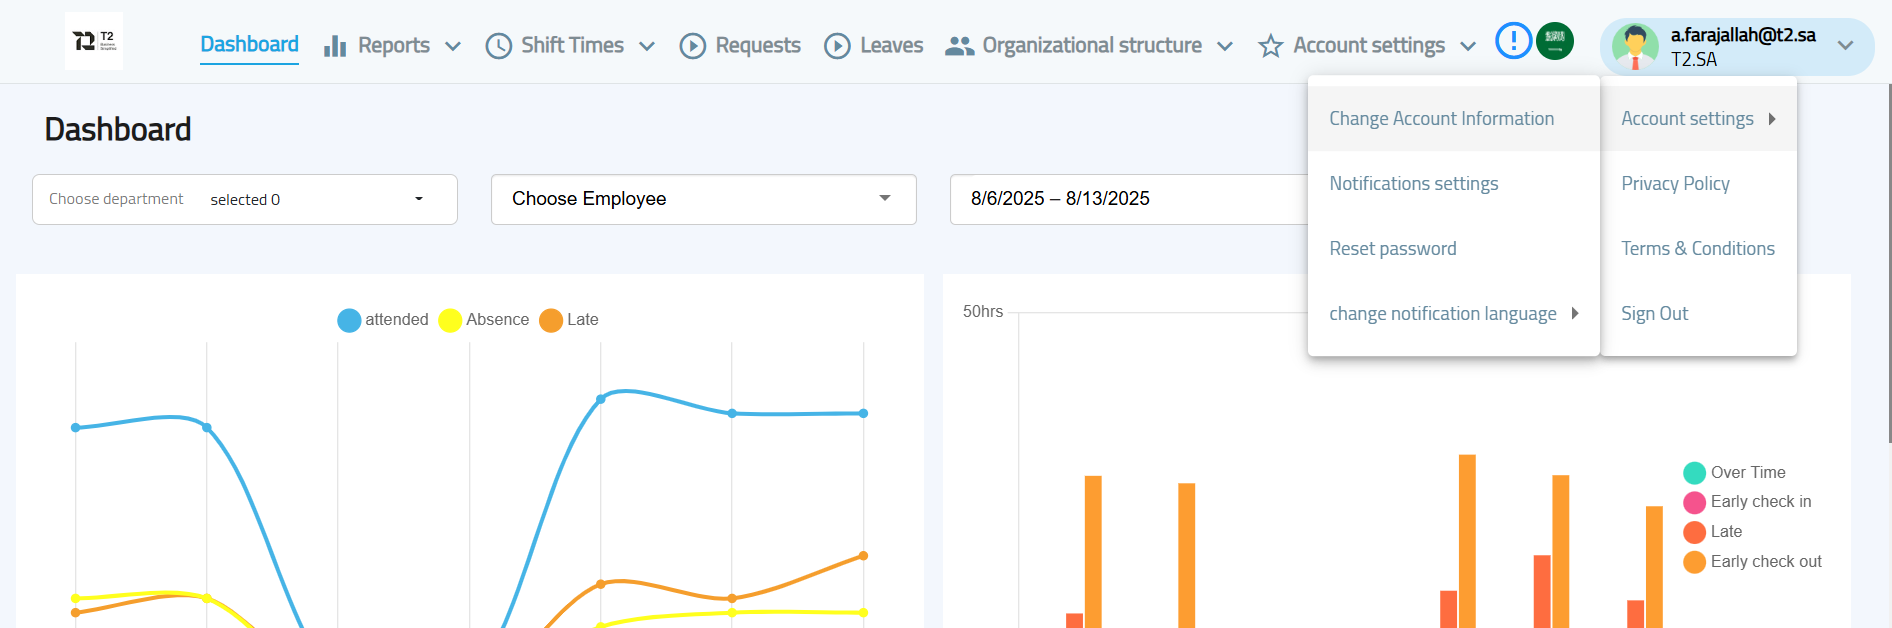
You can access Account Settings by clicking the "Account Settings" tab from the main menu.
Within Account Settings, you can manage:
-
Locations
-
Questions
-
Voice Phrases
-
Permissions & Roles
-
Notification Management
-
Change Account Information
-
Change Notification Language (Arabic / English)
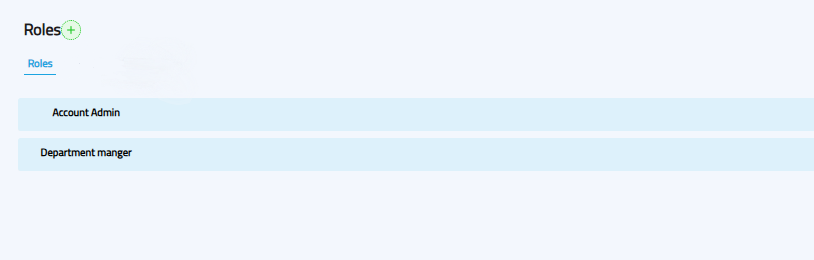
1. Permissions & Roles
This section allows the creation and management of roles with specific permissions. Roles can then be assigned to employees to control their access in the system.
To access:
-
Go to the web portal.
-
Click Account Settings.
-
Select Permissions.
Default roles in Availo include:
-
Account Manager
-
Department Manager
Available actions:
-
Add a new role (+ button)
-
Assign a role to an employee
-
Edit an existing role
-
Delete a role
-
Activate/Deactivate a role
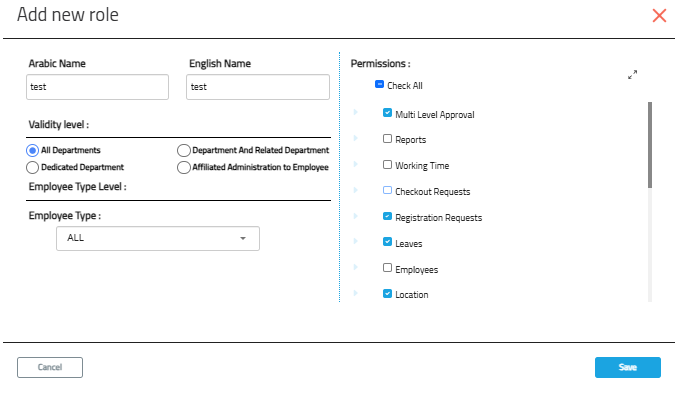
Adding a New Role
When you click the + Add New Role button:
-
Role Name: Enter in both Arabic and English.
-
Permission Level:
-
All Departments – Applies to all system users.
-
Department & Sub-departments – Applies to a department and its sub-departments.
-
Employee’s Department – Applies only to the department the employee belongs to.
-
Custom Departments – Select specific departments for this role.
-
-
Permissions: Choose the specific system features the role can access.
Assigning Roles to Employees
-
Click Assign next to the desired role.
-
Search for the employee.
-
Select the employee and click Add.
-
Confirm linking the employee to the role.
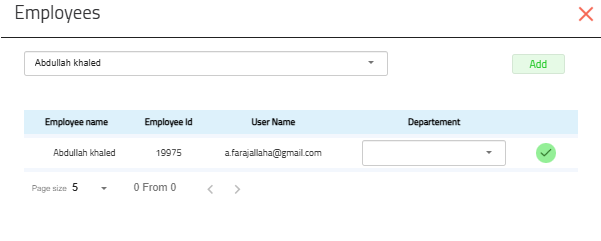
-
If the employee belongs to multiple entities, choose the correct one.
-
Additional permissions can be given via the Edit Employee screen, which will only apply to that specific employee.
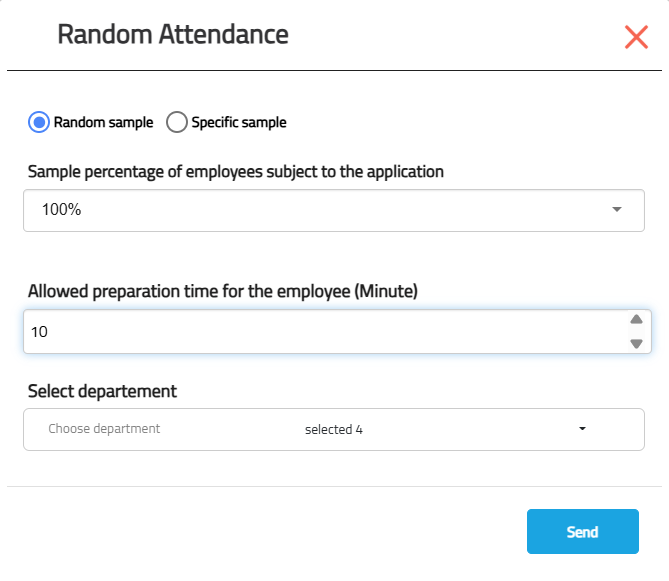
Random Attendance Settings (Paid Feature)
You can access these settings by clicking your username in the top corner and selecting "Account Settings" from the dropdown menu.

This feature is used to request sudden proof of attendance from employees to verify their presence. It can be activated in two different ways:
1. Random Sample
In this mode, the random attendance request is sent to a random percentage of employees. Its settings include:
-
Sample Percentage: Defines the percentage of employees who will be randomly selected to receive the request.
-
Allowed Time (minutes): Sets the time limit in minutes for an employee to respond after receiving the request.
-
Select Entity: Defines the department or entity to which the random sample will apply.
2. Specific Sample
This mode is used to target specific employees with the random attendance request. Its settings include:
-
Allowed Time (minutes): Sets the time limit in minutes for the employee to respond.
-
Select Entity: To choose the entity to which the employee belongs.
-
Select Employee: To select the desired employee directly.
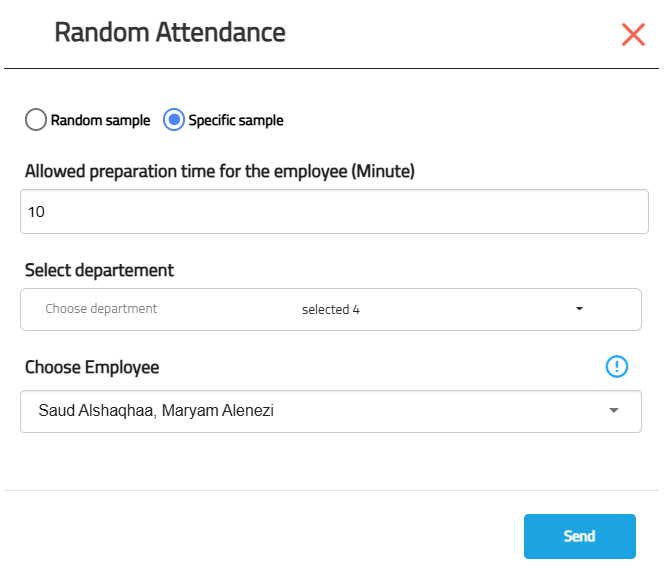
The results of these requests can be tracked through the "Random Attendance Report" available in the Reports section.
A. Notification Management
This feature allows you to set up attendance and departure notifications for employees.
To access:
-
Go to Account Settings.
-
Click Notification Management.
Available actions:
-
Add a new notification
-
View all existing notifications
-
Edit notification details
-
Delete a notification
-
Activate/Deactivate a notification
Adding a New Notification
-
Set Notification Timing:
-
Minutes before/after/during the event
-
Choose whether it applies to Start (Check-in) or End (Check-out) times
-
Example: "15 minutes before the start of work time"
-
-
Notification Content:
-
Enter text in both Arabic and English
-
Optionally insert the employee’s name
-
Notifications are sent based on the employee’s assigned work plan.
B. General Notifications (Paid Feature)
These notifications are created manually by administrators to send custom messages to selected employees or departments.
They are not linked to work shifts and can be sent immediately or scheduled.
This featrue is paid.
Adding a New General Notification:
-
Select Channel:
-
Firebase → Sends a push notification to the Availo mobile app.
-
Email → Sends the message to the employee’s email address.
-
You can select one or both.
-
-
Enter Notification Content:
-
Content (Arabic) — Maximum 150 characters.
-
Content (English) — Maximum 150 characters.
-
-
Select Recipients:
-
Choose the Department.
-
Optionally, select individual Employees.
-
If no employees are selected, all in the chosen department will receive it.
-
-
Notification Time:
-
Now → Send immediately.
-
Schedule → Set a specific date and time.
-
-
Save the notification.
-
Attendance & Departure Notification: "Don’t forget to check out — 10 minutes left!" (linked to shift end).
-
General Notification: "Team meeting at 3 PM in the main conference room" (sent to all employees in the Finance department via app and email).
1. Account Settings
1.1 Accessing Account Settings
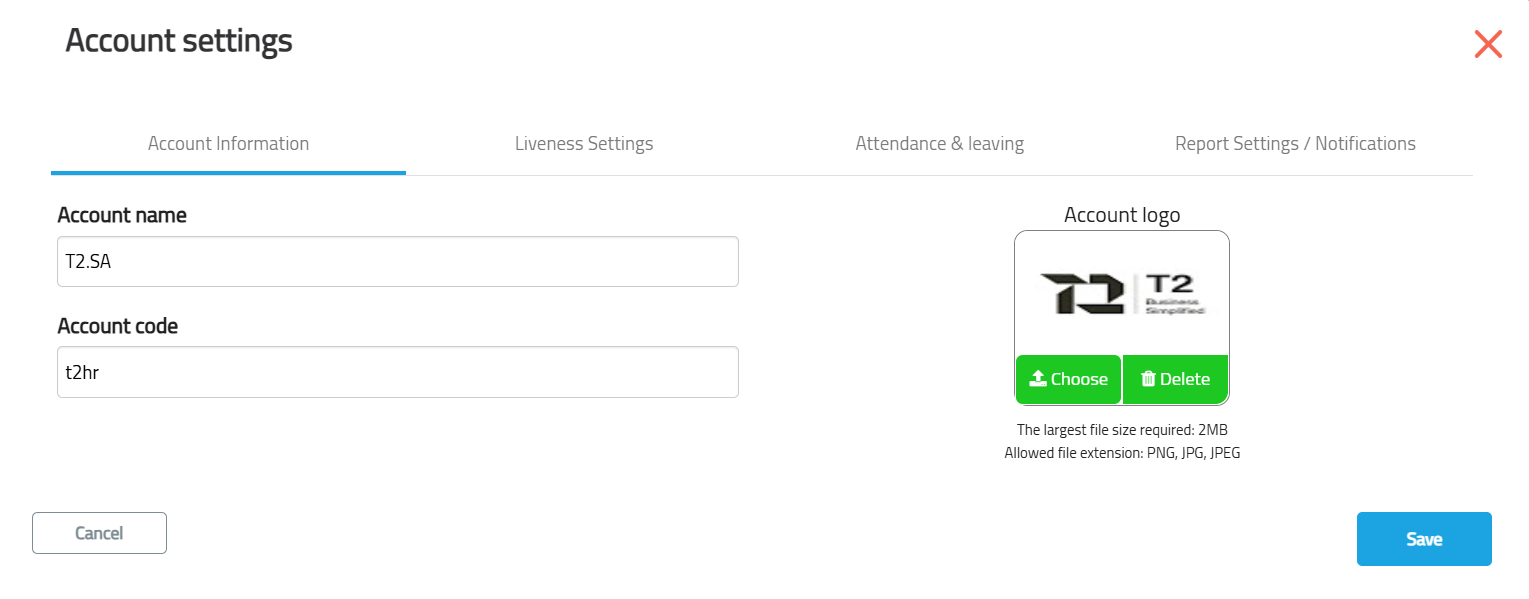
From the top navigation bar, click Account Settings to access all configuration options.
1.2 General Account Information
-
Account Name & Code: Enter the official name and code of your organization.
-
Logo: Upload a high‑resolution PNG/JPG to display your brand across the system.
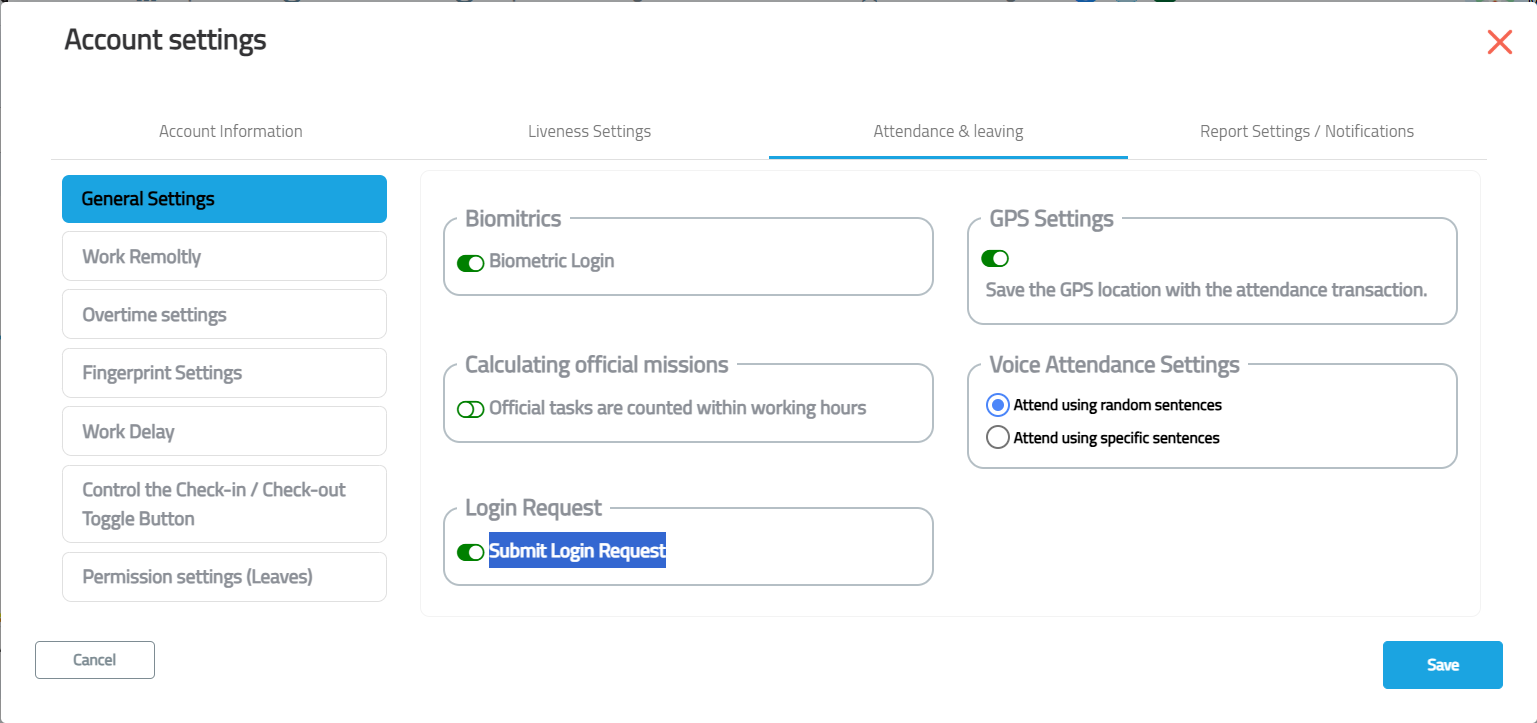
1.3 Attendance & Leaving
This section defines how employees record their attendance.
General Settings
-
GPS Location Verification: Save the GPS location with the attendance transaction.
-
Biometrics: Biometric login
-
Official Leave Calculation: Choose whether to deduct only working days or all days when calculating leave.
-
Submitting Check-in Requests via Mobile App
Feature Overview: This allows the employee to submit a request to register their attendance (Check-in) by selecting the specific time and today's date through the mobile application.

Leave Type : "Half Day"
The system has been updated to include a new option among the available leave types, designated as "Half Day."
-
Feature Purpose: This addition allows users (employees) to submit a formal leave request for a portion of the day (equivalent to a half work-day), rather than having to request a full day.
-
Mechanism: When this leave type is selected, the system will apply the rules configured for calculating a half work-day.
-
Access and Setup Path: This option can be accessed and configured via the following path: Account Settings → Change Account Information → Attendance Settings → Leave Requests → Select "Half Day" from the list.

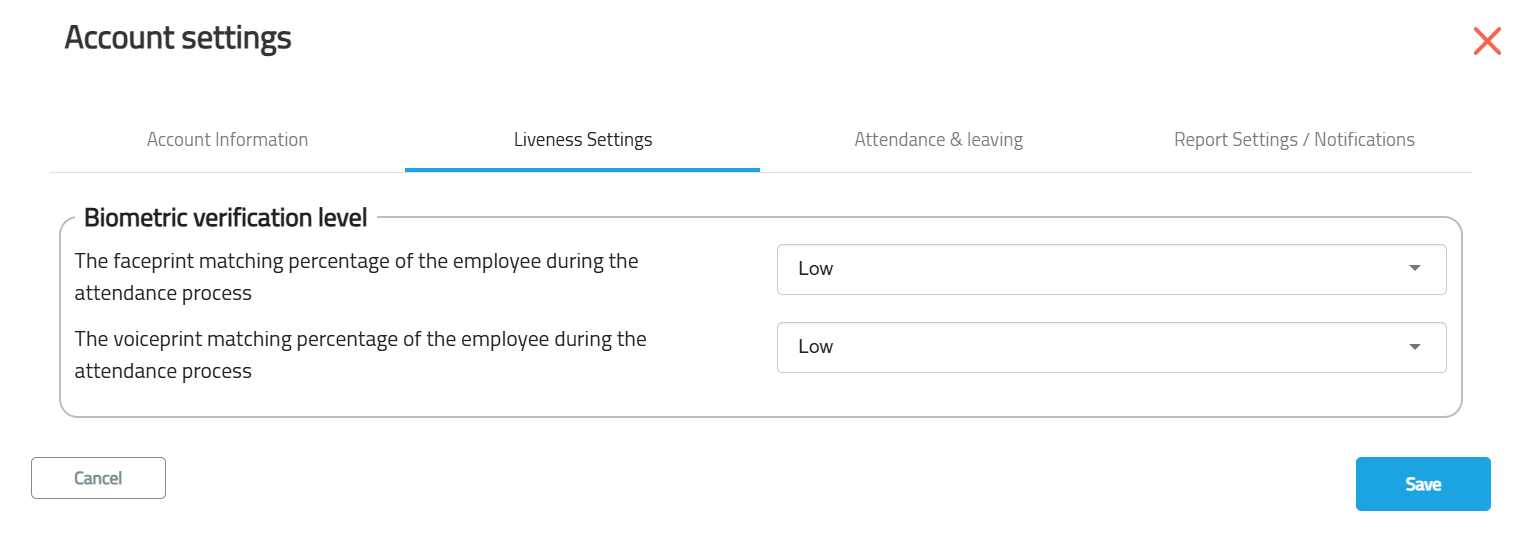
Liveness Settings
-
Define the matching accuracy required for face and voice prints (e.g., low, medium, high).
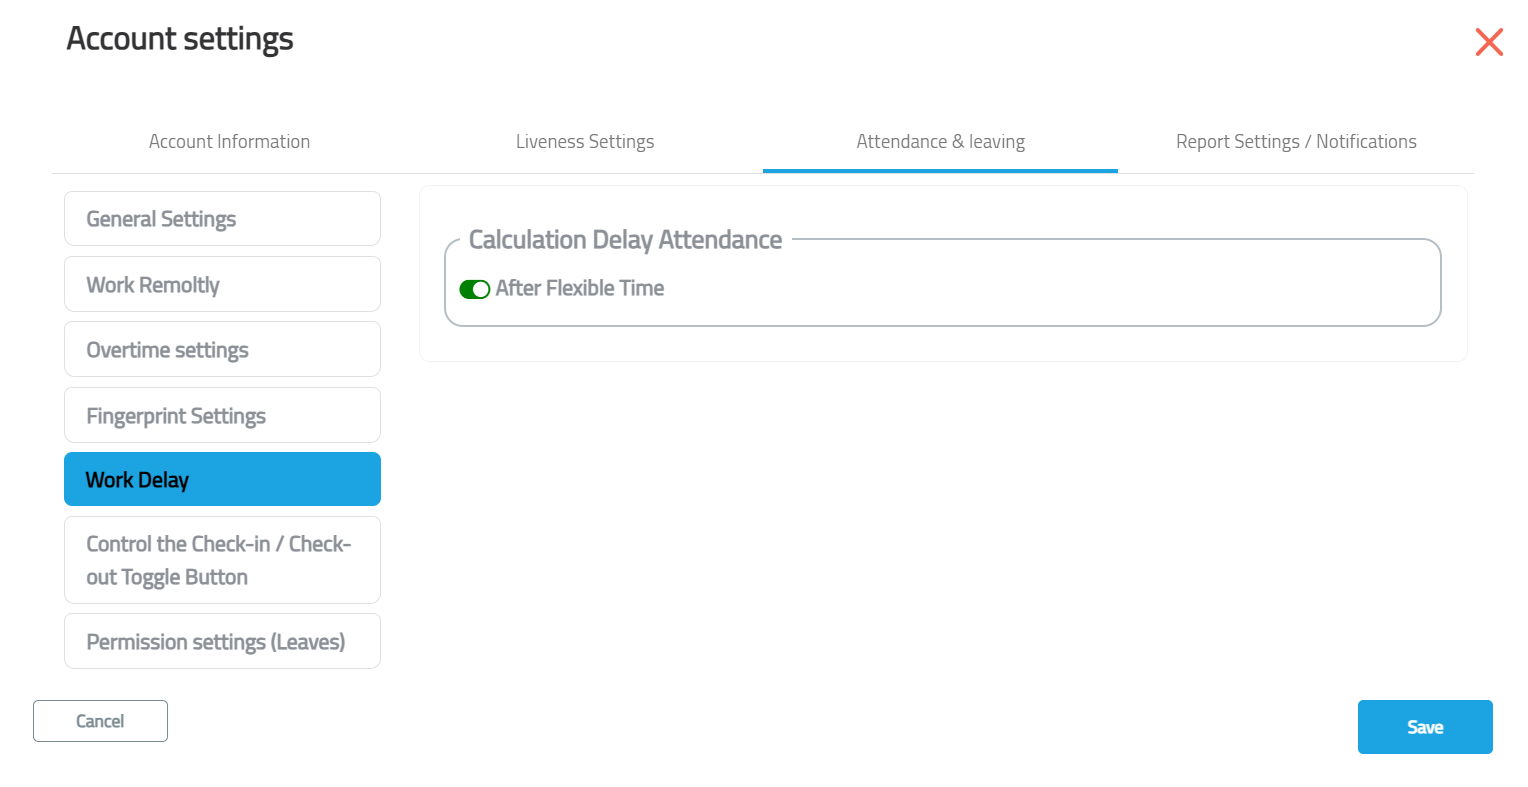
Work Delay
-
Calculation Delay Attendance :
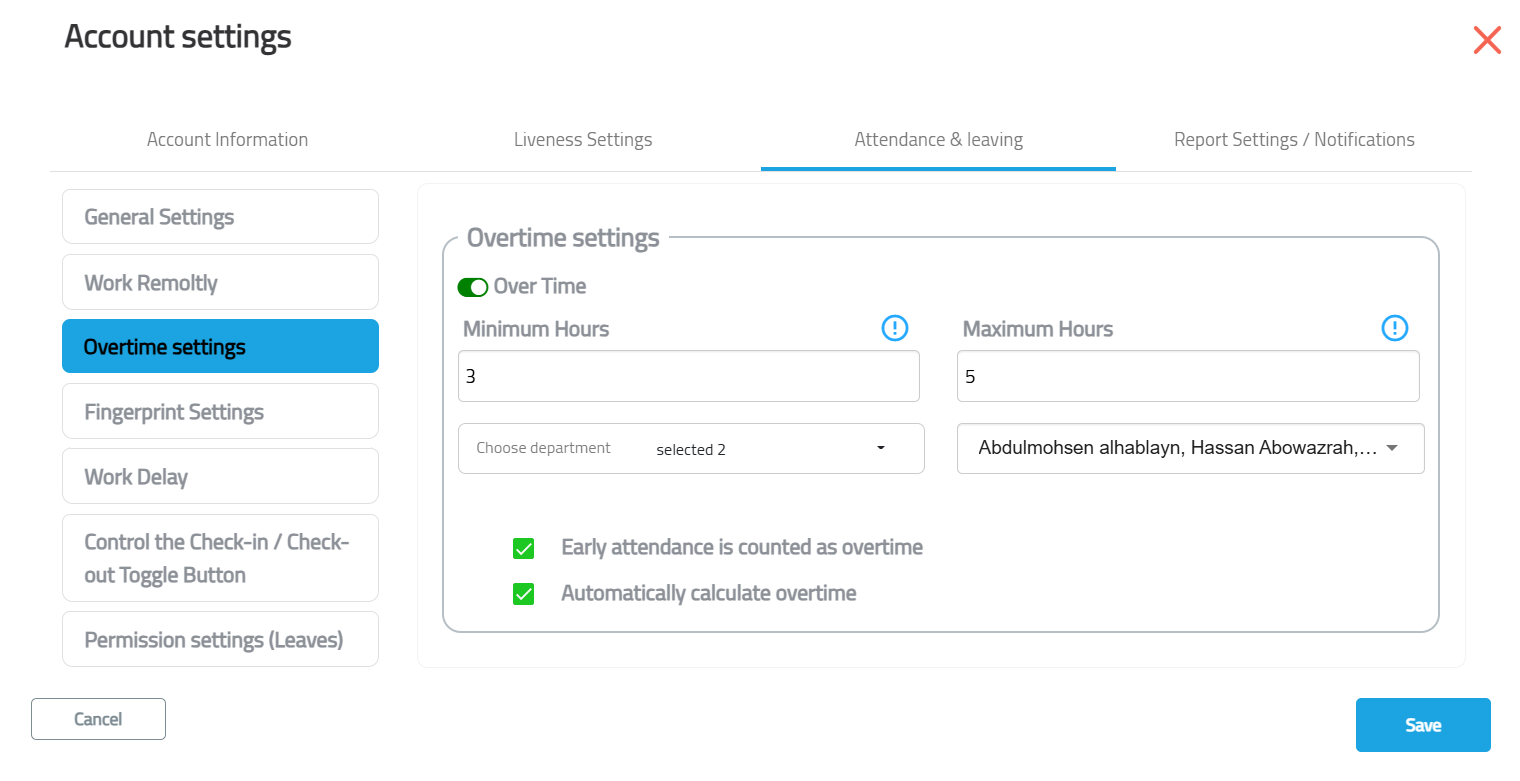
Overtime Settings
-
Set minimum and maximum overtime hours.
-
Choose whether early attendance counts as overtime.
-
Enable or disable automatic overtime approval.
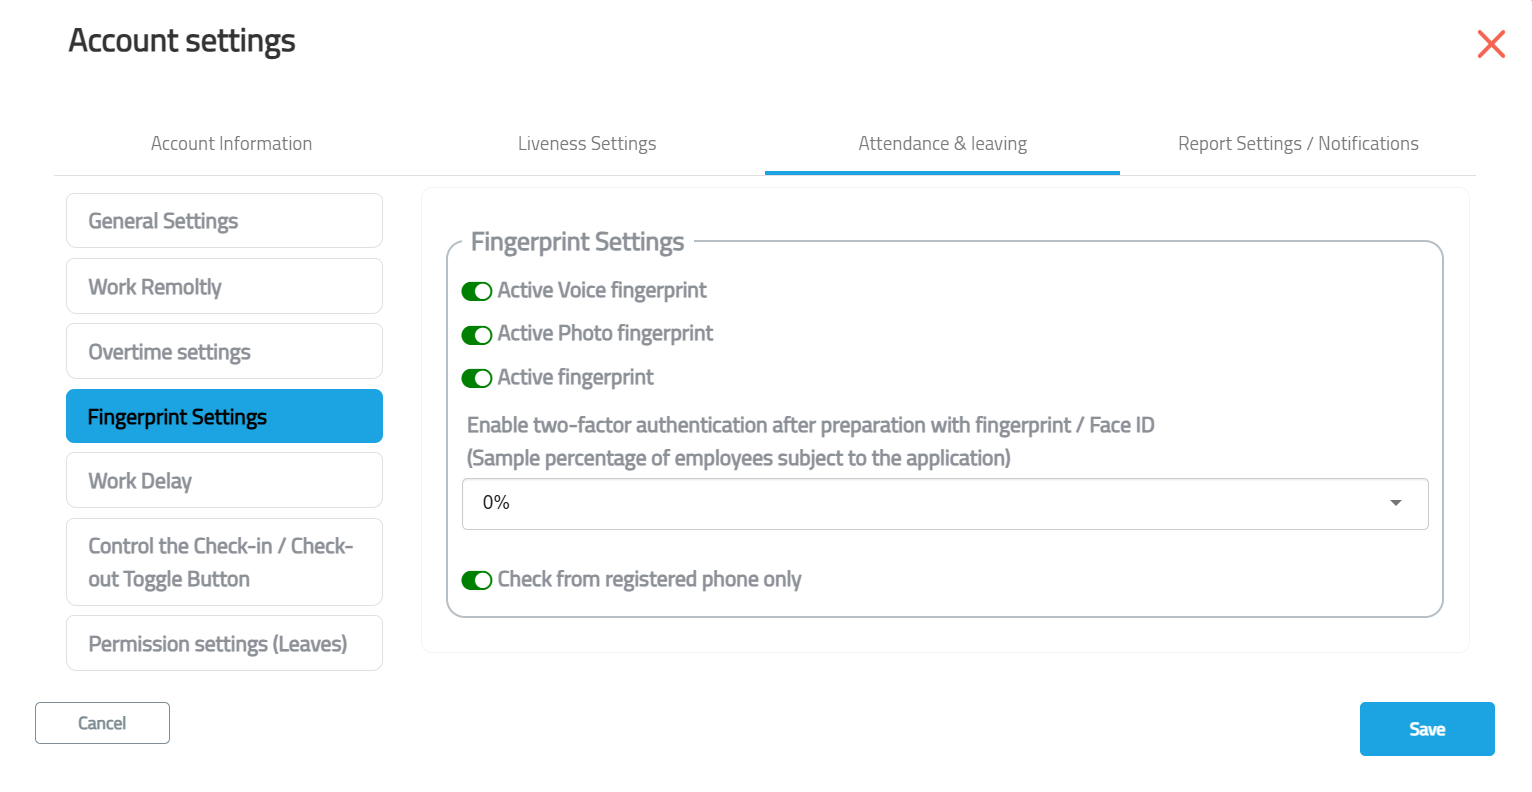
Fingerprint Settings
-
Toggle voice, photo and fingerprint options.
-
Specify the percentage of employees subject to two‑factor authentication.
-
Restrict attendance to the registered device for added security.
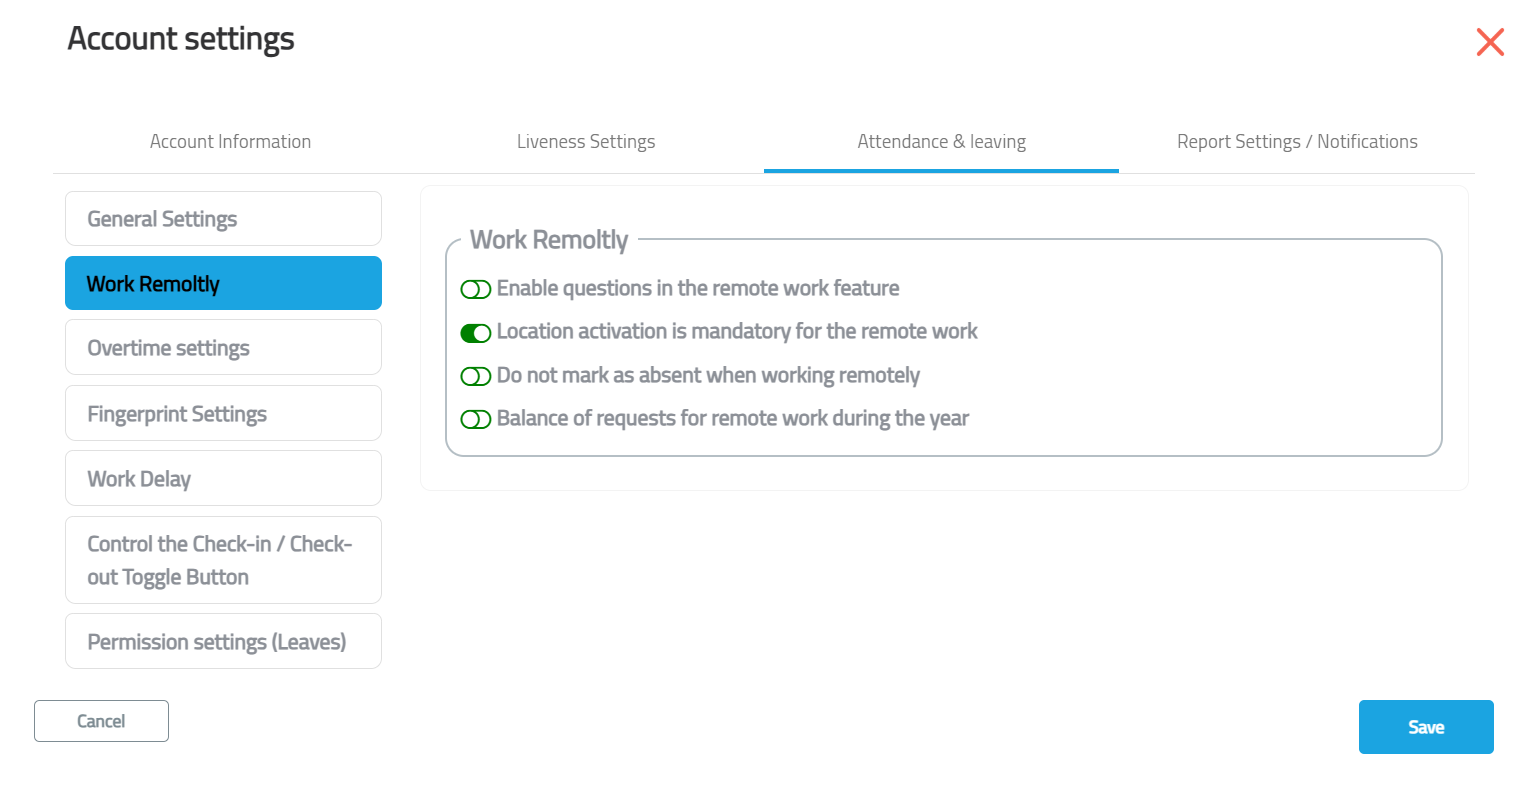
Work Remotely
-
Set questions to verify remote work attendance.
-
Determine if location verification is mandatory.
-
Define how many remote‑work days employees may request per year.
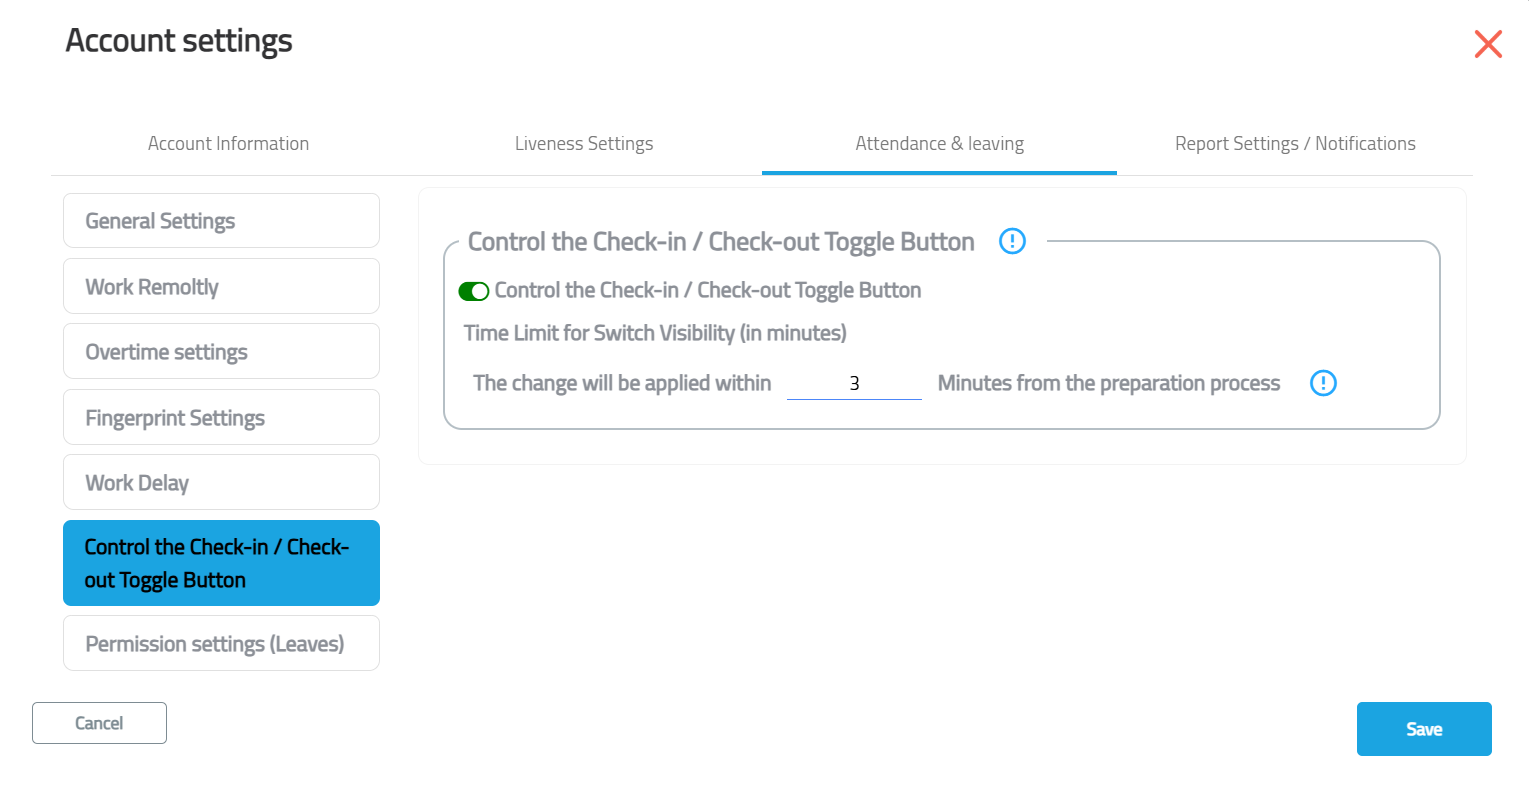
Control the Check‑in / Check‑out Toggle Button
-
When enabled, employees can manually toggle between check‑in and check‑out.
-
Set the time limit for how long the toggle appears after preparing the process.
Permission Settings (Leaves)
-
Enable or disable the number of permission hours allowed.
-
Specify maximum hours per month and per day.
-
Choose leave categories (Leave, Excuses, Official) from dropdowns.

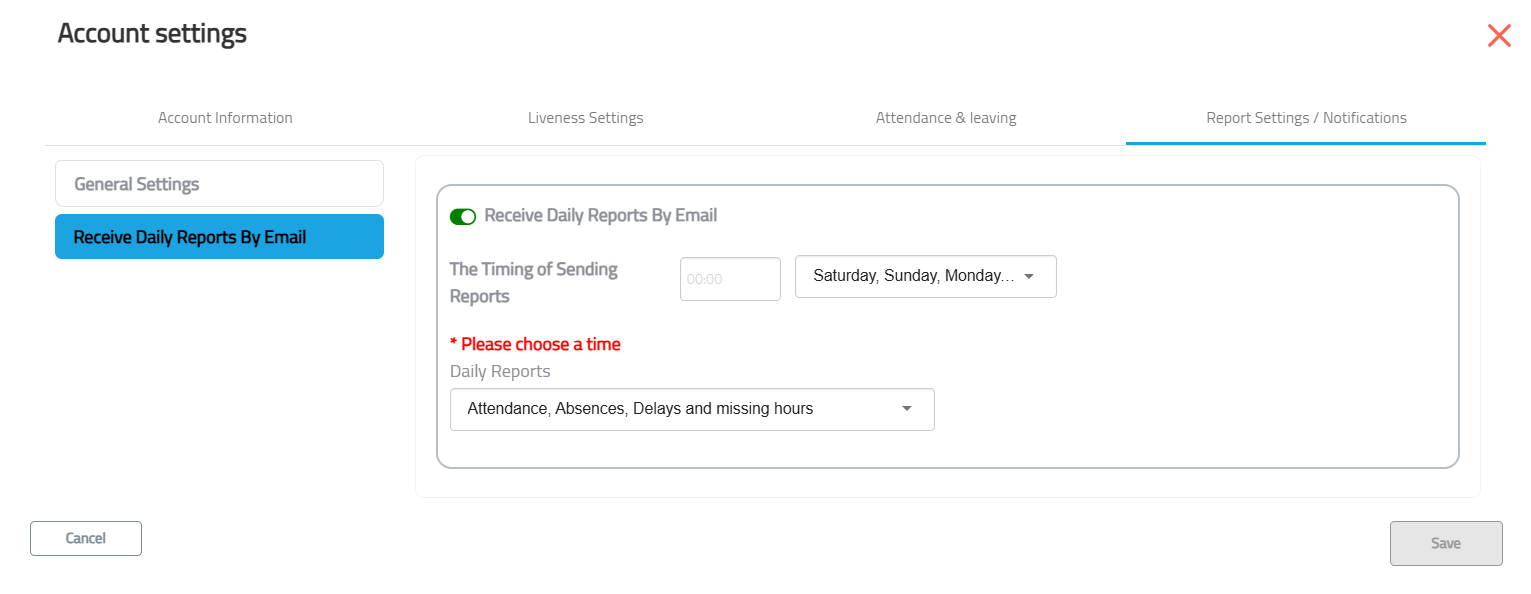
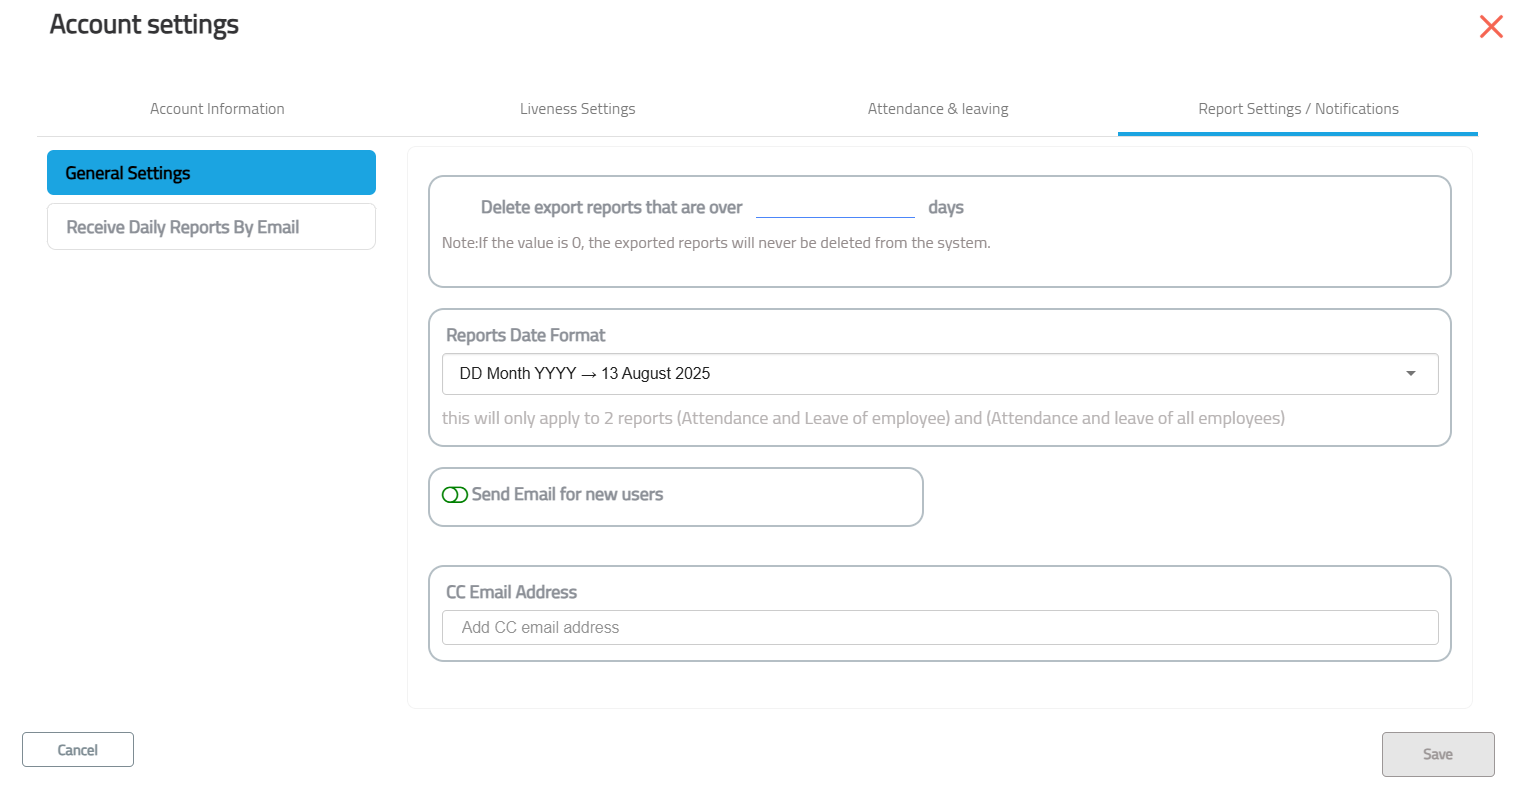
1.4 Report Settings / Notifications
Manage automated notifications and report distribution:
-
General Settings: Delete exported reports after a certain number of days; define the date format; set CC email addresses; and decide whether to email new users.
-
Send Work Attendance Report: Automatically email attendance reports to employees.
-
Receive Daily Reports: Receive daily summary emails for attendance, lateness and absence; choose which days and time to send.
-
Receive Absentee Report: Get reports based on the number of absences (per week, month, year, consecutive days); schedule the time of sending.